An Overview of How DIY Acrylic Keychains Work For Beginners;
Have you ever wanted to create a one-of-a-kind accessory that is both practical and can reflect your personality? Creative and a fun way to make a personalized accessory is these do-it-yourself acrylic keychains. Out of the endless possibilities of creating a gift for a friend or even a project for yourself, these embellishments have everything. Whether you want to create an intricate design, use bold colours or both, the potential is limitless.
On top of that, creating them is actually simpler than you think! The following guide will introduce you gradually and help you to begin exploring the art of making DIY acrylic keychains.
Materials Needed For DIY Acrylic Keychains;
A few basic supplies are all that are required to commence making DIY acrylic keychains. To begin, obtain a few coloured or clear acrylic sheets. They come in various depths and hues making it possible for you to alter your designs to suit your preferences.
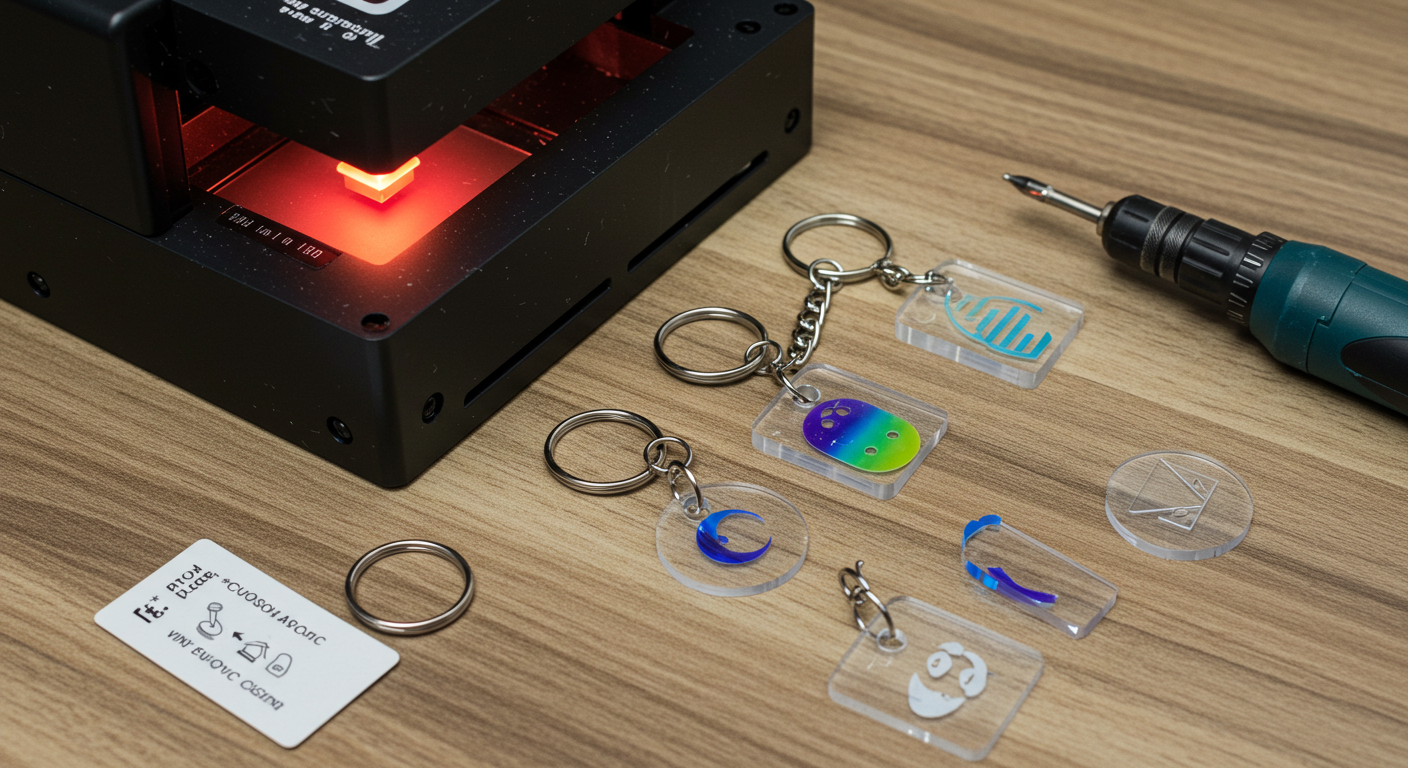
In addition to the above, a cutting tool will be required. If you need complex shaped designs cutting out the acrylic sheets then a laser cutter is the best option. For less elaborate designs a craft knife will suffice. Always remember to wear safety goggles when dealing with sharp-edged instruments! Holes for keychain rings can be created with very small jump rings if you happen to have some; otherwise, drill bits will suffice. Pick small bits that correspond to the size of your jump rings.
To draw more attention to some critical aspects of your work, you can try to paint pens or permanent markers as they will enhance the artwork with a jewelled touch. As a final point of advice, it would be a substantial mistake not to invest in essential materials such as jump rings and keychain clasps since these items will significantly enhance your output. Once you have these materials, rest assured your crafting will only get better as you will take a more personalized approach while creating keychains.
A step-by-step guide on how to create DIY acrylic keychains;
Making your own acrylic keychains is not only straightforward but also the results are very much satisfactory in the end. To begin with, you need to pick a design to start off with, and a tip here would be to go for a design that appeals to you. From simple geometric designs to even text, the options are never-ending.
- Selecting a Design
Selecting a design for your acrylic keychain is the first and the most fun step. What part of your personality or interest would you want to represent? Be it a quote, a pet, or just an avant-garde approach, there is no limit.
You may want to plan different designs beforehand by putting them on the paper. This helps to determine whether you want a particular design or wish to change it further. Do not shy away from different combinations of shapes and colors to create something out of the world.
Avoid forgetting the entire concept behind the project and try and keep it minimal; complex designs may not render on smaller scales. Do emphasize boldness and clarity, it will make the keychain pop and yet be attractive.
- Sourcing the Acrylic
Sourcing your acrylic mark is a very important part of the DIY process. First, get your acrylic sheets and make sure these are clean, without dust or fingerprints. A microfiber cloth would do.
Following that, measure and draw out the dimensions for your keychain design. Draw this with a ruler and a fine-tip marker so that the lines are accurate. It is wise to be very precise here since it will greatly assist in the cutting process later on. If your acrylic has colours and patterns, visualize how it appears once it has been cut out in the specific shape. Well, cut out those foam inserts and take this opportunity to use the colours that appeal to you.
- Cutting the Acrylic
Cutting acrylic is not an easy task however, It can be simple once you have the right tools and right methods. First step – make sure you keep the acrylic sheet on a flat hard surface – it is important for clean-cut purposes.
And for smaller designs, a scoring tool or a craft knife would suffice. In order to make a deep line along your design line, score it several times. Then gently pull the acrylic apart at the score line after cutting it till the depth is sufficient. For greater accuracy, a jigsaw or laser cutter is recommended when dealing with larger components. When working with sharp instruments, do not forget to have your protective goggles and gloves on.
- Drilling Holes and Adding Jump Rings
Now it is time for the final aesthetically pleasing touch of holes and jump rings after cutting out the pieces from acrylic sheets. Start by using any tool that allows the pointer to mark the spot where the holes are supposed to be placed. It is usually the top or a corner for key chains.
Grab a drill and drill bit that is the same dimension as your jump rings. Slowly operate on it because the acrylic may crack. One can achieve perfect circle holes if there’s a steady grip on the drill. Using fine sandpaper after drilling should do the trick to cut down any rough edges. This step makes the feel of handling comfortable and also avoids any snags.
Always ensure everything is well fastened before you proceed to the concavity which will help make your keychain pendants truly worth it to look at.
- Personalization Options
Personalizing your DIY acrylic keychains makes them one of a kind. Let us start with colours that are appealing to you. Bright Hues or Simple Pastels? It is your decision. Let’s say you decide to add initials or names using vinyl lettering. This small detail adds charm to the state of your creation. You could also add symbols like a heart, a star, or even a small doodle that is related to something important in your life.
We recommend considering the addition of charms! To the keychain itself or as an added personal touch gift for a friend or family member, small pieces can make an improvement to the overall theme. Everything can be tailored to suit your idea; go nuts!
How to go about making Your DIY Acrylic Keychains a Success?
Fully prepare yourself for failure, if you do not pay attention to the basic aspects, for example, if you only buy acrylic materials for making Hoover force a highly precise material that can destroy all those efforts in making the DIY acrylic keychains
For cutting, always choose sharp tools. You will ruin the appearance of your keychain if the blade is not sharp. Before cutting or starting to drill, prepare a sketch of your design on paper. With this precaution, one is able to conceive how it will be applied to the acrylic.
Don’t be in a rush to drill holes. A controlled pace keeps a safe distance for cracks and increases the accuracy factor. Try combining different colors and finishes. A single colour may bore the viewer when different shades or glitter can make it lively and interesting.
When using any kind of equipment, you have to put on appropriate safety equipment. Safety comes first place when doing anything, especially a DIY project. And most importantly, do not be afraid to go wild! It gives you the chance to go wild while putting your personal touch on every piece, making it one of a kind.
Different Techniques for Crafting Acrylic Keychains at Home;
DIY acrylic keyrings can be more than just ornaments, it is easier to imagine them as unique gifts or some form of a keepsake.
- Transform them into bag charms to reflect some character on your backpack or purse. Custom crafting can even make the most mundane bags appear attractive.
- Replace your keychains and turn them into a bookmark. Tie them onto a ribbon to easily fix your position in the book.
- Another good idea is to use them as gift bag tags and give a personalized touch by adding names or inspirations on them as a message to go with the given gift.
- You could also create holiday and celebration packs for pumpkins on Halloween, trees on Christmas, or even cupcakes on a birthday rather than creating Christmas packs.
- Last, also consider them as identifiers for your house keys, as it is quicker to distinguish them with their unique shapes during rush hours.
Conclusion;
There is a sense of freedom and satisfaction in creating your own DIY acrylic keychains. You can carve out something that reflects your individuality and your creativity. Turning designers into reality. Each piece of the keychain is more than just an accessory; it is what you made.
It is pure joy to wear an accessory that has been designed by yourself. The twenty-four keys can each replace a lock in or around your head – content, phrases, even attitude! Whether for personal use or as a very thoughtful present for relatives and friends these specially made trinkets hold much value. So grab all the stuff and unleash your inner artist. Feel the bliss which comes when you create something that transforms everyday moments into better ones with just a single idea.